Introduction
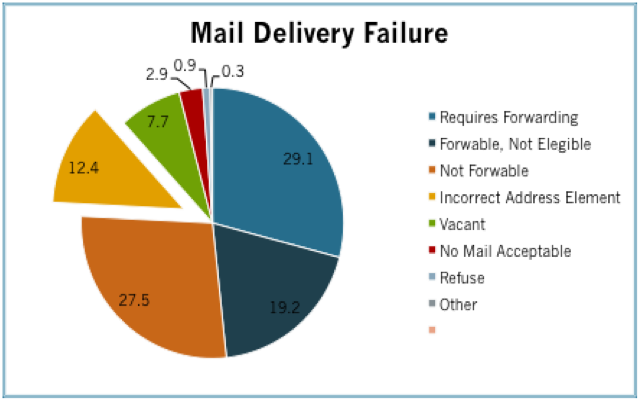
An accurate customer database is one of the most valuable assets a business can have. Incorrect customer addresses increase the cost of doing business and reduces profit margins. On May 17 of 2009, The United States Post Office published in the National Postal Forum Summit the annual cost of Undeliverable As Addressed (UAA) mail is estimated to be $1.856 billion. 12.4% of this amount is related to addresses with bad elements. Figure 1 contains a breakdown of the different reasons why mail is not delivered. The cost of fixing a customer address varies depending on the complexity and cost of a business process or the stage of the process at which the address discrepancy is found. This article analyses a couple of cost effective and easy to implement solutions to reduce the number of records with incorrect address due to bad address elements.
Quantify the Problem
For a company like Amazon, a shipment with a bad address represents additional cost and an exception in the business process. For a smaller company like the guys mowing my lawn, a bad address represents a delay in revenue since customers cannot be billed on time. Independently of the business line or application for which you want to introduce the techniques outlined in this article, it is important to understand the scope of the problem and quantify the cost to the business. This information will allow you to measure the effectiveness of the solution at different time periods after implementation. Financial matters aside, let’s discuss specifics.
Typical Address Capture
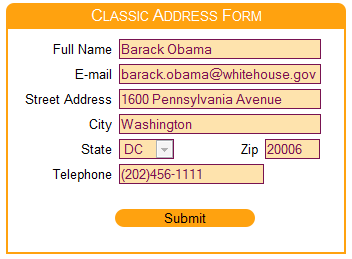
Figure 2 illustrates a HTML form capturing a customer address. Similar forms can be found in e-commerce web sites or in-house applications. The layout of the form is human friendly and does not give the application an opportunity to proactively fill in address information based on related data elements. The user is required to enter the entire address and at that point the address is ready for validation.
Enhanced Address Capture – Round 1
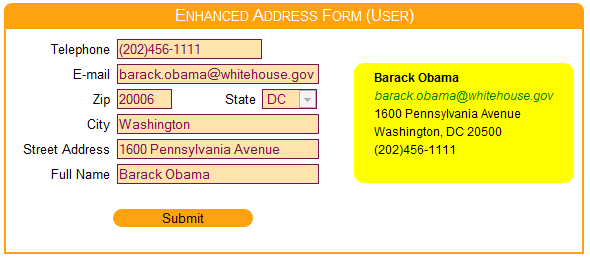
Figure 3 rearranges the form to allow the application to obtain related data elements as the operator enters information. This approach enhances the user experience and increases the accuracy of the address information. An additional visual element has been introduced to display the address in USPS format. This implementation uses the following data elements relationships.
- A successful reverse telephone lookup can generate the customer address.
- A zip code lookup can generate the city and state of the address. This will require the customer/operator to enter only the street address.
Enhanced Address Capture – Round 2
Figure 4 provides an implementation aimed to Customer Service Representatives (CSR). It provides a similar address resolution scheme to the previous solution. It also adds value by including an embedded Google map and enhanced spelling for targeted fields using NATO phonetic alphabet. This last feature is activated by placing the mouse over the field label and is a result of observing CSR work with different customers while creating new accounts or making modifications to existing ones. A CSR usually spells back to the customer email, city, address and name. In my experience, the number of fields that get spelled back to the customer depends on factors such as familiarity of the customer or CSR with the English language, speaker accent, quality of phone connection or complexity of the data. For instance, 30 Maine Street can be easily understood as 30 Main Street due to any of the conditions previously listed.
Another advantage of introducing a common spelling solution is the NATO phonetic alphabet can be replaced or modified to include words that mask the CSR accent. This facilitates the communication between customer and CSR and provides consistency to the task of spelling information back to the customer. 30 Main Street will be unambiguously spelled by all CSRs as three, zero, Mike, Alfa, India, November, Space, Sierra, Tango, Romeo, Echo, Echo, Tango.
Using the Code
The code is broken in three main tiers. The presentation tier running on the browser and composed of address.html, tutorial.cs, tutorial.js and additional JQuery plugins for general UI support. The middle tier on the web server where the proxy for the reverse telephone lookup runs in the form of an Ajax WCF web service and the data layer where the data provider (whitepages, Google, etc.) stores telephone registration information. The HTML form is setup to run as a singleton in the tutorial.js file.
var theForm = new function MainForm() {
    var instance = null;
    var controller;
    this.getInstance = function() {
        if (instance == null) {
            instance = this;
            init();
        }
       return instance;
    }
    function init() {
        controller = new FormController
		(new InputAddressView(), new FriendlyAddressView());
        controller.init();
    }
}

$(document).ready(function() {
    theForm.getInstance();
});
The initialization of the form takes place during the document ready event generated by JQuery. Two composite views are created, one responsible for capturing user input and managing the map control, the other responsible for displaying the address in USPS format. The controller is responsible for sending/receiving data to/from the middle tier and handling events generated by the InputAddressView control. During initialization, the FriendlyAddressView registers with the controller to receive notification when address information changes. The InputAddressView does not need to register for notification since it is the only view capable of modifying the customer address. The controller initializes the views with default data, configures the reverse phone lookup proxy and notifies all subscribed views the main view has changed. All this displays a form with all fields blank ready for user input.
this.init = function() {
	_inputAddressView.init(THIS);
	_friendlyView.init(THIS);

	addressData = Data.Repository.getNewCustomer()
	setAddressView();
	proxy.setHandler(onTelephoneLookupHandler);
	fire(this);
}
The initialization of the InputAddress dynamically creates each input control (telephone, cellphone, zipcode, etc.) by providing the HTML placeholders where the labels and fields need to be generated. Each control is responsible for generating the input field it represents with the necessary label, masking, length, events, etc.
var _controller;
var zipCode = new CustomTextBox("zipCodeContainer",
	"zipCode3", "", "", "Zip", "", "99999", 5, onZipCodeKeyUp);
var state = new stateComboBox("stateContainer", "state3",
	"StateClass", "", "State", "ZipClass", onStateChange);
var cmbState1 = new stateComboBox("stateContainer1", "state1",
	"StateClass ReadOnly", "DC", "State", "ZipClass");
var cmbState2 = new stateComboBox("stateContainer2", "state2",
	"StateClass ReadOnly", "DC", "State", "ZipClass");
var street = new PhoneticTextBox("streetContainer", "streetAddress3",
	"TextBox", "", "Street Address", "", onStreetKeyUp);
var city = new PhoneticTextBox("cityContainer", "city3",
	"TextBox", "", "City", "", onCityKeyUp);
var fullName = new PhoneticTextBox("fullnameContainer",
	"fullName3", "TextBox", "", "Full Name", "", onFullNameKeyUp);
var email = new PhoneticTextBox("emailContainer", "email3",
	"TextBox", "", "Email", "", onEmailKeyUp);
var cellphone = new telephoneTextBox("cellphoneContainer",
	"cellphone3", "", "", "Cell", "", onCellphoneKeyUp);
var telephone = new telephoneTextBox("telephoneContainer",
	"telephone3", "", "", "Telephone", "", onTelephoneKeyUp);
The telephoneTextBox control is configured to notify the form when the phone field is complete. The form notifies the controller which in turn captures the new telephone number, notifies any view subscribed for notification and requests the reverse phone lookup proxy to perform a lookup.
this.onTelephoneChange = function(sender, data) {
	addressData.setTelephone(data);
	fire(sender);
	proxy.telephoneLookup(data);
}
A successful phone lookup is handled by the onTelephoneLookupHandler method of the controller which captures the new data, updates all views and schedules the map refresh to take place the next time a field loses focus. The map cannot be updated while the user is typing because the iframe where the map is located captures the focus during the map update. Not scheduling the map refresh has the side effect of the current field losing the focus and the data if the field has a mask. The reverse phone lookup takes place while the user is entering the cell phone or email for the customer. Note that the use case dealing with multiple persons registered to a single telephone number is not addressed in this example. The first person registered is used for the example provided.
function onTelephoneLookupHandler(data) {
	if (!data.d.found)
		return;
	addressData.setZipCode(data.d.zipCode);
	addressData.setState(data.d.state);
	addressData.setCity(data.d.city);
	addressData.setStreet(data.d.street);
	addressData.setFullName(data.d.name);
	_inputAddressView.setAddress(addressData, true);
	refreshMapOnChange = true;
	fire(this);
}
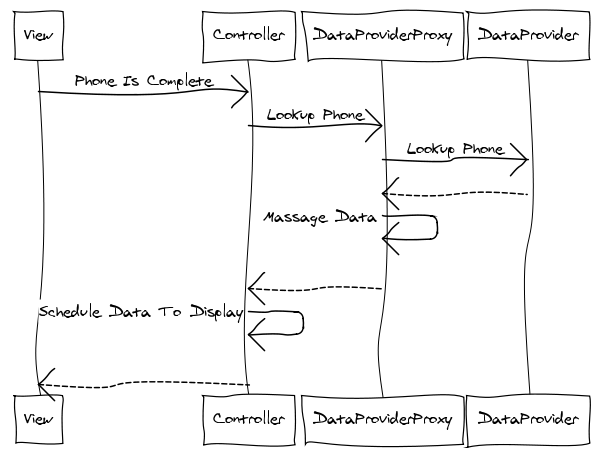
Figure 5 illustrates a sequence diagram of the reverse phone lookup. As a side note, the diagram was generated with the on-line sequence diagram generator provided by Web Sequence Diagram.
The zip code resolution uses a similar approach, except instead of calling a web service hosted in the middle tier, one is called hosted at www.geonames.org. The call is triggered by the controller when the zip code has five digits. A successful lookup captures the city and state associated with the zip code and updates the views accordingly.
this.onZipCodeChange = function(sender, data) {
        var zipText = data.replace("_", "");
        addressData.setZipCode(data);
        if (zipText.length == 5)
            $.getJSON("http://www.geonames.org/postalCodeLookupJSON?&country=
		US&callback=?",
            	{ postalcode: zipText }, onLookupResponse);
        else {
            fire(sender);
        }
    }

function onLookupResponse(response) {
	if (response && response.postalcodes.length &&
		response.postalcodes[0].placeName) {
		addressData.setCity(response.postalcodes[0].placeName);
		addressData.setState(response.postalcodes[0].adminCode1);
		fire(this);
		setAddressView();
		_inputAddressView.focusOnStreet();
	}
}
The reverse telephone lookup is handled by the getAddress method of the web service. Multiple components implementing the IAddressRepository interface are provided to experiment performing reverse phone lookups against WhitePages, Google and AnyWho. Each connector submits the data to the site and parses the returned HTML file to get the address information. Note, the usage of public websites to screen scrape telephone information is not recommended for critical applications and may violate the terms of use of the targeted site. Consider the usage of this technique in the context of the provided code as a pedagogical instrument.
[OperationContract]
public Address getAddress(string telephone)
{
	PhoneRepository.IAddressRepository repository =
				new WhitePagesAddressRepository();
	IList<PhoneRepository.Address> list = new List<PhoneRepository.Address>();

	try
	{
		list = repository.getAddress(telephone);
	}
	catch( System.Exception ex )
	{
	}
	Address newAddress = new Address();
	if (list.Count > 0)
	{
		newAddress.city = list[0].city;
		newAddress.state = list[0].state;
		newAddress.zipCode = list[0].zipCode;
		newAddress.street = list[0].address;
		newAddress.name = list[0].firstName + " " + list[0].lastName;
		newAddress.telephone = list[0].phoneNumber;
		newAddress.found = true;
	}
	else
		newAddress.found = false;

	return newAddress;
}
Testing The Code
The project is configured to run inside the web server embedded in Visual Studio and launch the address.html page. Once the page comes up, perform the following tests.
- Enter a telephone number – some have been provided as example. While entering the cell information, the address associated with the phone number will be populated. The map is not refreshed until the focus is moved from the current field.
- Put the mouse on the label of fields with the spelling icon. The NATO phonetic spelling will be displayed if the field contains text.
- Press the spelling icon. This will display a dialog with the NATO phonetic spelling in both English and Spanish and allow modification of the field.
- Enter a valid zip code; both the state and city will be updated with the right values.
Conclusion
Reverse phone look up combined with resolution of city and state from a zip code can increase the accuracy of a customer address and reduce the time it takes a CSR to capture this information. Phonetic spelling can standardize the way information is spelled back to the customer and alleviate language related problems. These techniques combined reduce the number of bad addresses in your application database and the time CSRs spend with customers.

