
In previous posts I discussed How to Install Arduino Template Express and How to Create a Sketch. In this post let’s discuss how to create a library using Arduino Template Express and what are the advantages and disadvantages of partitioning your code into libraries. Let’s go!
Divide and Conquer
In order to understand the benefits of libraries, let’s begin by creating the same hello world sketch we created in the How to Create a Sketch post. Follow those instructions and come back when you have a working sketch in place. Let’s take a look at the main.cpp file to discuss what is going on in the sketch. See Listing 1.
#ifndef SKETCH_H_
#include "Sketch.h"
#endif
/* Running counter */
static unsigned long counter = 0;
//#pragma message "Sketch Running At: " XSTR(F_CPU) " HZ"
void setup()
{
/* Setup pin connected to board LED for output */
pinMode(LED, OUTPUT);
/* Initialize serial interface */
Serial.begin(SERIAL_SPEED);
/* Show build information via serial interface */
#if defined(ENABLE_TEXT_MESSAGE)
ShowBuildInfo();
#endif
}
void loop()
{
digitalWrite(LED, HIGH);
delay(DELAY_LENGTH);
digitalWrite(LED, LOW);
delay(DELAY_LENGTH);
Serial.print(MESSAGE);
Serial.println( ++counter );
}
Listing 1 – Hello World Sketch
This is a monolithic sketch. Everything it does is packed into one single development unit. The sketch uses the Serial library and functions from the core Arduino library, but the functionality of flashing the LED and sending notifications via the UART are packaged in a single program. As the code stands it is truly a one developer job and contains the following structural (not functional) deficiencies.
- Unit Testing this code is very difficult. At best you will be able to verify the LED goes on an off, but testing for LED initial conditions and controlling the timer is very difficult.
- Having multiple developers work in this program is not possible. Everything is packed into a single unit of work (main.cpp).
- Reusing any code of value you develop in this sketch is not possible. At best you will be able to use clipboard inheritance (copy and paste for the object oriented challenged).
- Replacing the on board LED by an external LED driven from a II2C/SPI chip requires a great deal of changes because main.cpp is operating too close to the metal by invoking digitatWrite directly.
Let’s visualize how a library can help with our design by introducing a layer of abstraction. If this was production code, I would make sure there is also a layer of abstraction for the serial communication and for the timer. For the purpose of this example I will concentrate on the LED. The sketch main job is manipulating the state (ON|OFF) of a pin by calling digitalWrite(). Let’s introduce the concept of a Led class with two functions on and off. Figure 1 illustrates the class diagram of the ILed interface and possible implementations.

Figure 1
Programming to the ILed interface allows swapping different implementation transparently at compile or run time. Instead of calling digitalWrite directly the sketch will invoke ILed.on() or ILed.off() to turn the LED on or off. What are the advantages and disadvantages of introducing this level of abstraction? I am glad you asked. Let’s start with the advantages.
- Programming to an interface promotes code reuse and in this case allows the design of the sketch to evolve to support an Led directly attached to the micro controller or attached to an external component with which the micro controller can communicate. Besides SPI or II2C you could turn on and off an LED via a XBee, WiFi, or radio interface. The possibilities are multiple as long as you implement the ILed interface.
- Unit Testing an ILed implementation is possible and independent of the main code. Once an implementation is tested it can be shared and reuse in binary form with a high degree of confidence. This promotes good design practices such as the Open/Closed principle.
- Multiple developers can work now on this sketch. One in the main.cpp sketch and the others in the implementation of the Led, SPILed, II2CLed classes. The developer responsible for main.cpp will integrate to the different implementation as they become available. The size of this sketch does not warrant such a division of labor, but in a the context of a bigger project, this option is a plus.
- The code becomes more cohesive, a desirable trait, this benefits a few “ilities” such as maintainability, reliability, reusability, and understandability. See Cohesion Metrics for Predicting Maintainability of Service-Oriented Software and Software Design Metrics for Predicting Maintainability of Service-Oriented Software.
Not all is good news, the introduction of ILed in the code has the following disadvantages:
- After introducing ILed and the Led implementation, the size of the sketch is bigger. The introduction of abstract classes (the interface of the class diagram) carries a virtual table that takes more memory than the direct digitalWrite approach. In fact according to avr-size, the primary memory usage of the release version of the sketch goes from 3,176 bytes (9.7%) to 3,676 bytes (11.2%), while the data usage goes from 267 bytes (13%) to 296 bytes (14.5%). This increment in size is not related to using a library, but to the introduction of ILed into the design.
- The solution is more complex. There are more moving parts and more code to develop in order to provide an abstraction layer for the LED.
Let’s refactor the code to introduce a library. To add a library project to the solution, right-click on the solution and select add/project. The new project dialog appears. See Figure 2. Select Arduino Library Wizard, provide the name Led and select the default location to save it. Follow the wizard and select the same development board you previously selected for the sketch. This will create a new library project named Led in your existing solution.
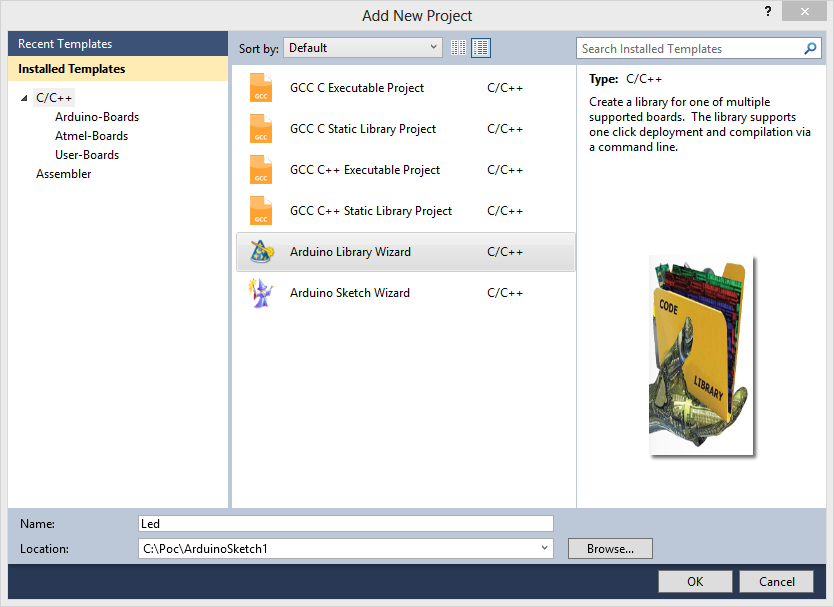
Figure 2 – Adding new library
You can download the full solution with the sketch and the library at the end of the post. All paths for the sketch to find the library have been added using relative paths. This is a manual step that I expected Atmel Studio to take care of when I added the library as a reference to the sketch, but unfortunately it did not happen. See Listing 2 for the new sketch code.
#include

/* Running counter */
static unsigned long counter = 0;

/* Micro-controller connected LED */
Led led;

/***************************************************
Return LED as ILed to isolate caller from what
type of ILed is used
****************************************************/
ILed* getLed()
{
	return &led;
}

 void setup()
 {
	 /* Initialize LED */
	 led.Init(LED);

	 /* Initialize serial interface */
	 Serial.begin(SERIAL_SPEED);

	 /* Show build information via serial interface */
#if defined(ENABLE_TEXT_MESSAGE)
	ShowBuildInfo();
#endif

 }

 void loop()
 {
	 getLed()->On();
	 delay(DELAY_LENGTH);
	 getLed()->Off();
	 delay(DELAY_LENGTH);
	 Serial.print(MESSAGE);
	 Serial.println( ++counter );
 }
Listing 2 – Hello World Sketch with ILed
Line 35 and 37 take care of turning the LED on and off. Reading the code makes it clear you are dealing with an LED. I could have created a global ILed pointer and initialize it during setup(). The getLed() function provides an opportunity for putting logic that may switch at run time the type of LED the sketch controls. The source code for the solution with both projects can be downloaded from here.
For Arduino developers making the transition to Atmel Studio, I hope this post has given you an introduction to how to use libraries in your projects. Coming from the Arduino IDE, an environment that promotes code reuse as source code, hides the true advantages of using libraries to decouple functional areas of an application.

When I try to create a ATE library for TimerOne Arduino library it was only available libTimerOned.a but not libTimerOne.a.
I have copied TimerOne.cpp and TimerOne.h to Atmel Studio 6.1 and I build and deploy it with success.
In the previous version of ATE it works perfectly.
Could you help me to find a solution for this problem?
Regards
Make sure you are compiling both debug and release. The debug version has the d at the end and the release version does not.
Thanks. Now it works perfect after relocate corresponding files.
Sketches are running perfectly meanwhile libraries are presenting an exclamation mark and referring an Atmel studio directory instead an ATE directory.
Regards.
Hello,
when I installed the ATE everything is OK, but the “boards.xml” -file is empty. Why?
Pingback: ATMEL | Pearltrees