This article is no longer relevant. Please follow the Arduino Template Express update to find a more mature offering to allow development of Arduino sketches in Atmel Studio 6.1.
The Arduino IDE is a good development environment to get started with microcontrollers. It holds your hand and hides complexities that get in a novice way. As you gain experience and want to use advance features such as refactoring, assembly language or binary libraries, working with the Arduino IDE just doesn’t cut it. Moving to a more advance IDE is the next logical step for a mature Arduino user. It is the equivalent of leaving your home to go to college. Jaycon Systems has a well written three part tutorial explaining how to configure Atmel Studio 6.0 to compile Arduino projects. I have taken a different approach to solve this problem and have created an installation script to accomplish the following;
- Distribute a binary file for the core library (libcore).
- Distribute binaries of the Arduino libraries (libEEprom, libEthernet, libFirmata, libLquidCrystal, libSD, libServo, libSoftwareSerial, libSPI, libStepper, libWire).
- Distribute a solution with projects for all the libraries specified above so libraries can be recompile and redeployed as needed.
- Distribute a project template for Arduino Sketch. This allows you to do a new project and select Arduino Sketch from the list of available templates.
- Distribute a project template for Arduino Lib. This allows you to do a new project and select Arduino Library from the list of available templates.
- Distribute a deployment scripts to write sketches to the destination chip. This allows a one click deployment to the Arduino board.
The rest of this post covers the configuration of the installation script and the deployment scripts in the Atmel Studio environment.
Configuring Installation Script
In order to run the installation script, you need Arduino 1.0.1 or greater and Atmel Studio 6 or greater. Both of these programs must be installed and running successfully. The installation script is located at the Arduino Installer site at Codeplex. It contains all the binaries and scripts required for the installation. Follow these instructions carefully for a successful installation.
- Download the installation package from Codeplex
- Unzip in a directory of your choice. For the purpose of this post I am going to assume you have decompressed the installation script at c:\arduino-install.
- Open the file c:\arduino-install\install.bat with your favorite text editor and go to the :SetUserVariables label, around line number 31
- By default the ATMEL_CPU is configured to ATmega328p, change this line if necessary to reflect your microcontroller. Typical values are ATmega32u4 (Leonardo), ATMega328p (Uno), ATmega2560 (Mega), ATmega168 (Diecimila).
- The CPU_FREQUENCY and ARDUINO_VERSION do not need to be changed. I have tested with the Arduino 1.0.1 IDE successfully with these default values CPU_FREQUENCY=16000000 and ARDUINO_VERSION=100
- Set the COM_PORT variable to the communication port you are using to communicate with the Arduino board. The default is COM3.
- Set the COM_PORT_SPEED variable to the proper value if necessary. The default is 115200.
- The VARIANT variable refers to the pin layout of the board. Change it accordingly to reflect the type of board you have. The values are standard (Uno, Diecimila), leonardo (Leonardo), etc. The default value is standard.
- Last setup the AVRDUDE_ROOT_DIR variable with the value of the root director where the avrdude is located. This could be done from the Arduino installation or from Winavr. Note that the avrdude.exe would be at AVRDUDE_ROOT_DIR\bin\avrdude.exe from the path you specify.
- Save the file and open a command window. Go to the directory c:\arduino-install and run install.bat.
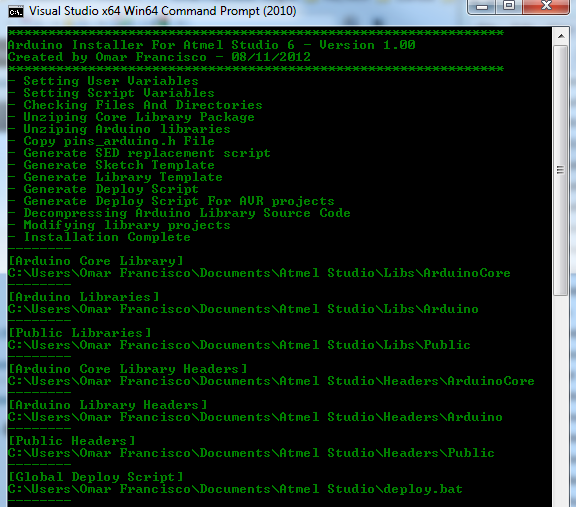
After a few seconds you should see an output similar to that illustrated on Figure 1. The installation script has done the following;
- Create directory structures at C:\users\YOUR_USER_NAME\Documents\Atmel Studio\Libs and Headers.
- Under Libs there are three directories, ArduinoCore for the core library, Arduino for all the Arduino libraries and Public for your personal libraries.
- Under Headers there are three directories, ArduinoCore for the core library headers, Arduino for the different Arduino library headers and Public for your personal library headers.
- All binaries and header files have been deployed to these directories.
- There is a file named deploy.bat located at c:\users\YOUR_USER_NAME\Documents\Atmel Studio. This file is responsible for performing generic solution and project name clean up and then invoking the localdeploy.bat file that is located in the Arduino project directory and is part of the sketch template.
- In the c:\users\YOUR_USER_NAME\Documents\Atmel Studio\Templates\ProjectTemplates there are two files. Arduino Library.zip and Arduino Sketch.zip, these are the library and sketch templates for Atmel Studio.
- At c:\users\YOUR_USER_NAME\Documents\Atmel Studio\ArduinoLibrariesSource a solution named ArduinoLibraries.atsln has been deployed with the source code for all the Arduino libraries so you can recompile them from within Atmel Studio if you wish to update the distributed binary libraries.
Configuring Deployment Script
The configuration of the deployment script allows you to do deployment of Arduino sketches with one click or keyboard shortcut. Sketches are deployed to the Arduino board while libraries are deployed to the Public folder of the library directory created by the installation script. Follow these instructions to configure the deployment script in Atmel Studio;
- Open the External Tool manager from Tools/External Tools
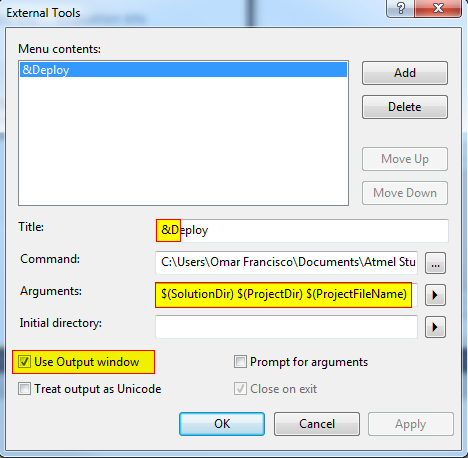
- Setup a new entry named &Deploy with the characteristics illustrates in Figure 2.
- The & before the D, makes it a hot key while in the context of the Tools menu. This means pressing ALT-T followed by D will launch the Deploy script.
- The parameters must be $(SolutionDir) $(ProjectDir) $(ProjectFileName). There is a space between each parameter.
- Select use Output window so you can see the outcome of the deployment within Atmel Studio.
- The top most entry is External Tool 1, the second one is External Tool 2 and so on. Moving the entries up or down changes the External Tool to the command located at the target position. If you have multiple external commands registered, keep track of the position where Deploy is located because we are going to need it later.
Let’s create a custom toolbar and add some commands that will facilitate the development experience.
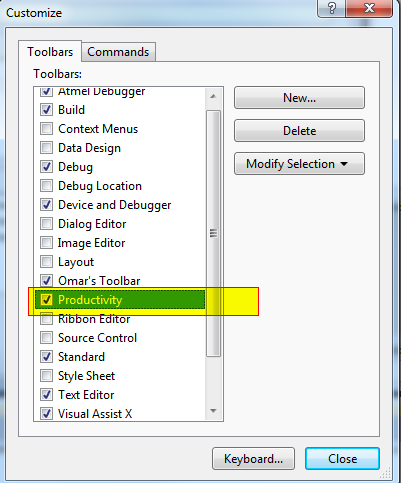
- Go to view\Toolbar\Customize and create a new toolbar.
- Name the toolbar Productivity. Hit OK and make sure the checkbox is selected.
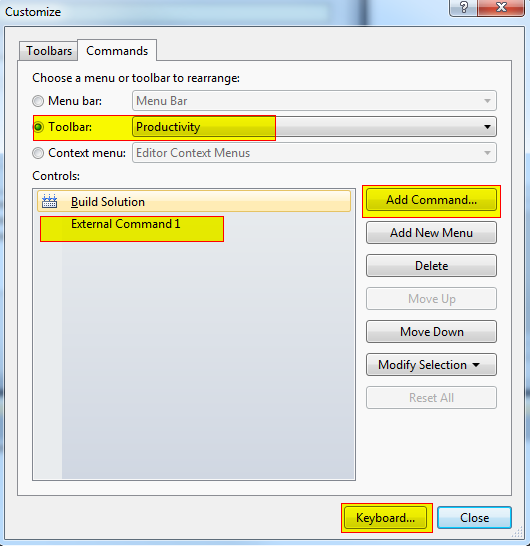
- Select the Commands tab and select the Toolbar radio button.
- In the drop down select the Productivity toolbar we just created.
- Add the command Build\Build Solution
- Add the command Tools\External Command1 (or whatever the name of the Deploy command is in your setup)
- Move it up and down as needed.
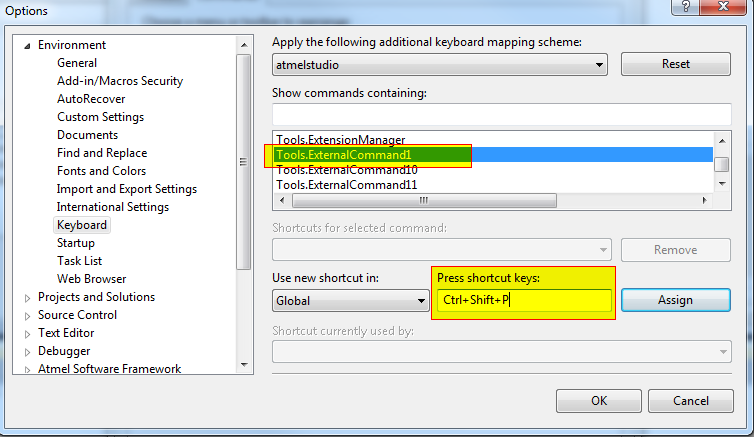
- Click on the Keyboard button and select the Tools.ExternalCommand1
- Enter a shortcut for it and press Assign. In my case I configured the Tools.ExternalCommand1, which is the Deploy script as CTRL+SHIFT+P
- Hit OK and we are done. You should see a toolbar with the following information.
The option to deploy is available via a click on the Deploy button in the Productivity toolbar or via CTRL+T followed by D or via CTRL+SHIFT+P. Any one of these three options should satisfy your workflow.
Creating Arduino Sketches
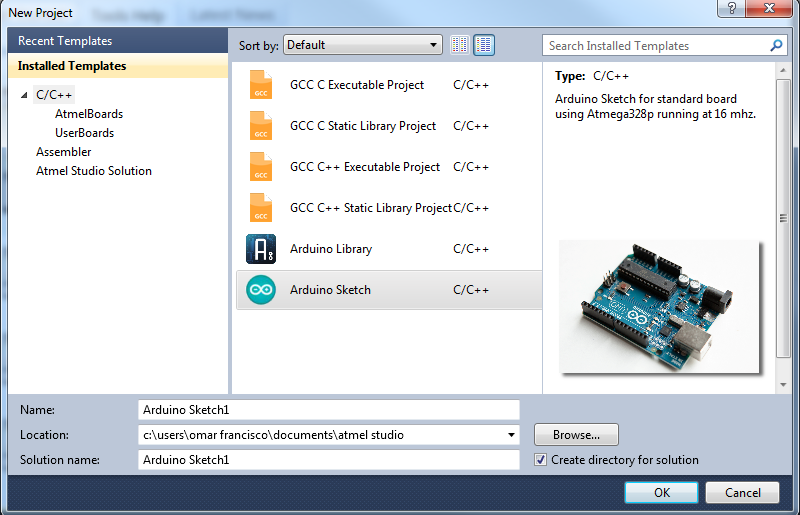
To create your first Arduino sketch in Atmel Studio 6, launch Atmel Studio, select File\New\Project. The new project window appears similar to figure 7 with all the installed templates.
Select Arduino Sketch, change the name to TestSketch1, change the location if necessary and press OK. A new solution is created with a project named TestSketch1. The project has three files, with the following content;
- main.cpp – contains code to blink the led on the Arduino board. This is so you can have a quick block of functional code.
- localdeploy.bat – this is the local deployment script. This file is called by the deploy.bat script located in your c:\users\your_user_name\Documents\Atmel Studio\deploy.bat. It gives you the opportunity to customize deployment for a particular sketch. The localdeploy.bat is ready to deploy the hex file located in the Release directory, not debug. This script reflects the port, speed and directory information provided to the installation script. I have submitted internal enhancement request AVRSV-3699 to Atmel to have the $(Configuration) variable exported to indicate you are running in Release or Debug mode. Until this issue is addressed the default hex file deployed is the one in the release directory. You can change the script to deploy from the Debug directory if necessary.
- readme.txt – This file contains a list of the Arduino libraries, which files you need to include and which libraries you need to add to the linker.
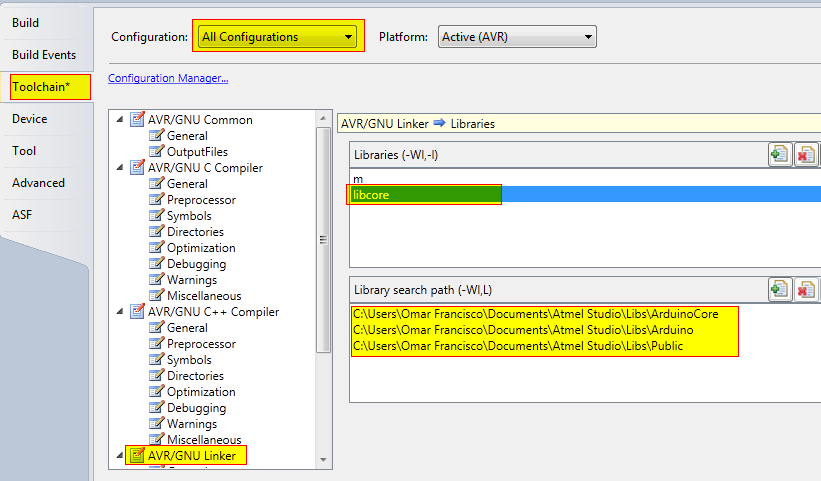
Before compiling the code you need to open the project properties (ALT-F7), select All Configurations and under Toolchain\AVR/GNU Linker\Libraries add libcore. See Figure 8. There is a bug in Atmel Studio 6 that does not include the libraries added to a project template. I have submitted internal bug AVRSV-3701 to Atmel for this issue. Note the Library search path is automatically populated with the directory structure where the libraries are located. After adding the library you can go ahead and compile the code, then press the deploy button in the Productivity Toolbar. You will see avrdude copy the hex file to the Arduino board and the onboard LED start flashing.
Creating Arduino Libraries
To create an Arduino library, select File\New\Project and select the Arduino Library template from the list of available templates. Name the library TestLib1 and change the directory as necessary. A new directory is created with four files.
- foo.h and foo.cpp contain a dummy class
- localdeploy.bat is the deployment script responsible for deploying the library and header files to the Public directory of the Lib and Header created during installation. As before only the Release version is deployed for the same reasons previously stated.
- readme.txt contains a blank file.
If you need a reference to libcore in your library you must add it as explained for the sketch. Deploying the library copies all the header files and *.a files to the Public directories.
Conclusion
Adopting Atmel Studio has the potential to increase your productivity and expose you to advance concepts such as mixed language programming (C/C++ and Assembly). If you are a Microsoft developer familiar with Visual Studio, you will feel right at home in Atmel Studio 6. Let me know if the script has been of assistance transitioning out of the Arduino IDE.

